Handleidingen voor diverse applicaties met Rocky 9: verschil tussen versies
Geen bewerkingssamenvatting Labels: Ongedaan gemaakt Visuele tekstverwerker |
Geen bewerkingssamenvatting Label: Ongedaan gemaakt |
||
| Regel 1: | Regel 1: | ||
{{DISPLAYTITLE:LINUX HANDLEIDING}} | {{DISPLAYTITLE:LINUX HANDLEIDING}} | ||
```bash | |||
# cd /var/www/html/ | |||
# curl -LO https://files.phpmyadmin.net/phpMyAdmin/5.2.0/phpMyAdmin-5.2.0-all-languages.tar.gz | |||
# tar xf phpMyAdmin-5.2.0-all-languages.tar.gz | |||
# ln -s phpMyAdmin-5.2.0-all-languages phpMyAdmin | |||
# vi /etc/httpd/conf.d/phpMyAdmin.conf | |||
================================================== | |||
Alias /phpMyAdmin /var/www/html/phpMyAdmin | |||
<IfModule mod_rewrite.c> | |||
RewriteEngine On | |||
RewriteCond %{HTTPS} off | |||
RewriteRule ^(.*)$ https://%{HTTP_HOST}%{REQUEST_URI} [L,R=301] | |||
</IfModule> | |||
< | <Directory "/var/www/html/phpMyAdmin"> | ||
AllowOverride AuthConfig FileInfo Indexes Limit Options=Indexes,IncludesNOEXEC,MultiViews,SymLinksIfOwnerMatch,FollowSymLinks,None | |||
Options -ExecCGI -Includes +IncludesNOEXEC | |||
Require all granted | |||
# Require all denied | |||
# Require ip 10.0.36.0/24 | |||
<FilesMatch "\.(inc|php)$"> | |||
<If "-f %{REQUEST_FILENAME}"> | |||
AddHandler "proxy:unix:/var/opt/remi/php81/run/php-fpm/www.sock|fcgi://localhost" .inc .php | |||
</If> | |||
</FilesMatch> | |||
</Directory> | |||
================================================== | |||
``` | |||
Om gebruik te maken van phpMyAdmin moet je wel een database hebben. | |||
Om deze te installeren doe je het volgende: | |||
``` | |||
sudo dnf install mariadb-server mariadb | |||
``` | |||
Dependency Tree: | |||
``` | |||
Transaction Summary | |||
================================================================================ | |||
Install 13 Packages | |||
Total download size: 18 M | |||
Installed size: 107 M | |||
Is this ok [y/N]: y | |||
``` | |||
Once installed, start and enable MariaDB the service: | |||
``` | |||
sudo systemctl enable --now mariadb | |||
``` | |||
Verify if the service is running: | |||
``` | |||
$ systemctl status mariadb | |||
● mariadb.service - MariaDB 10.5 database server | |||
Loaded: loaded (/usr/lib/systemd/system/mariadb.service; enabled; vendor preset: disabled) | |||
Active: active (running) since Sat 2022-07-23 10:05:47 CEST; 2s ago | |||
Docs: man:mariadbd(8) | |||
https://mariadb.com/kb/en/library/systemd/ | |||
Process: 18153 ExecStartPre=/usr/libexec/mariadb-check-socket (code=exited, status=0/SUCCESS) | |||
Process: 18175 ExecStartPre=/usr/libexec/mariadb-prepare-db-dir mariadb.service (code=exited, status=0/SUCCESS) | |||
Process: 20589 ExecStartPost=/usr/libexec/mariadb-check-upgrade (code=exited, status=0/SUCCESS) | |||
Main PID: 20448 (mariadbd) | |||
Status: "Taking your SQL requests now..." | |||
Tasks: 12 (limit: 23441) | |||
Memory: 78.5M | |||
CPU: 268ms | |||
CGroup: /system.slice/mariadb.service | |||
└─20448 /usr/libexec/mariadbd --basedir=/usr | |||
``` | |||
## #2. Using MariaDB on Rocky Linux 9|AlmaLinux 9 | |||
Once installed MariaDB/MySQL databases can be used. First, secure the installation by setting a password for the root user. | |||
```bash | |||
sudo mysql_secure_installation | |||
``` | |||
Proceed as shown: | |||
On MariaDB: | |||
``` | |||
NOTE: RUNNING ALL PARTS OF THIS SCRIPT IS RECOMMENDED FOR ALL MariaDB | |||
SERVERS IN PRODUCTION USE! PLEASE READ EACH STEP CAREFULLY! | |||
In order to log into MariaDB to secure it, we'll need the current | |||
password for the root user. If you've just installed MariaDB, and | |||
haven't set the root password yet, you should just press enter here. | |||
Enter current password for root (enter for none): Press_Enter | |||
OK, successfully used password, moving on... | |||
Setting the root password or using the unix_socket ensures that nobody | |||
can log into the MariaDB root user without the proper authorisation. | |||
You already have your root account protected, so you can safely answer 'n'. | |||
Switch to unix_socket authentication [Y/n] y | |||
You already have your root account protected, so you can safely answer 'n'. | |||
Change the root password? [Y/n] y | |||
New password: | |||
Re-enter new password: | |||
Password updated successfully! | |||
..... | |||
Remove anonymous users? [Y/n] y | |||
.... | |||
Disallow root login remotely? [Y/n] y | |||
... | |||
Remove test database and access to it? [Y/n] y | |||
.... | |||
Reload privilege tables now? [Y/n] y | |||
All done! If you've completed all of the above steps, your MariaDB | |||
installation should now be secure. | |||
Thanks for using MariaDB! | |||
``` | |||
Now login using the created root password: | |||
``` | |||
$ mysql -u root -p | |||
Enter password: | |||
Welcome to the MySQL monitor. Commands end with ; or \g. | |||
Your MySQL connection id is 10 | |||
Server version: 8.0.28 Source distribution | |||
Copyright (c) 2000, 2022, Oracle and/or its affiliates. | |||
Oracle is a registered trademark of Oracle Corporation and/or its | |||
affiliates. Other names may be trademarks of their respective | |||
owners. | |||
Type 'help;' or '\h' for help. Type '\c' to clear the current input statement. | |||
mysql> | |||
``` | |||
``` | |||
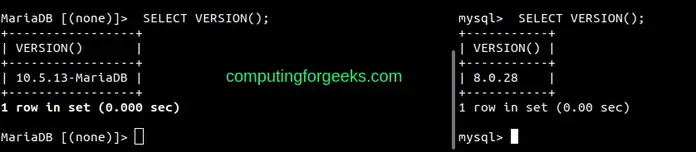
mysql> SELECT VERSION(); | |||
``` | |||
Sample Output: | |||
 | |||
### Create a User and Database: | |||
To create a user and database in MariaDB/MySQL, use the commands below replacing where required: | |||
``` | |||
CREATE DATABASE sampledb; | |||
CREATE USER 'test_user'@'%' IDENTIFIED BY 'Passw0rd'; | |||
GRANT ALL ON sampledb.* TO 'test_user'@'%' WITH GRANT OPTION; | |||
FLUSH PRIVILEGES; | |||
``` | |||
After this, you will have a database named **sampledb** and a user **test_user** who can be accessed remotely created as swell. | |||
Check the available databases: | |||
``` | |||
mysql> SHOW databases; | |||
+--------------------+ | |||
| Database | | |||
+--------------------+ | |||
| information_schema | | |||
| mysql | | |||
| performance_schema | | |||
| sampledb | | |||
| sys | | |||
+--------------------+ | |||
5 rows in set (0.00 sec) | |||
mysql> | |||
``` | |||
View users: | |||
``` | |||
mysql> SELECT User, Host FROM mysql.user; | |||
+------------------+-----------+ | |||
| User | Host | | |||
+------------------+-----------+ | |||
| test_user | % | | |||
| mysql.infoschema | localhost | | |||
| mysql.session | localhost | | |||
| mysql.sys | localhost | | |||
| root | localhost | | |||
+------------------+-----------+ | |||
5 rows in set (0.00 sec) | |||
mysql> | |||
``` | |||
To delete a user, use the command with the below syntax: | |||
``` | |||
DROP USER 'username'@'host'; | |||
``` | |||
### Create Tables | |||
We can then create and insert data into a table. For example in the created table above: | |||
``` | |||
USE sampledb; | |||
CREATE TABLE playground ( | |||
equip_id serial PRIMARY KEY, | |||
type varchar (50) NOT NULL, | |||
color varchar (25) NOT NULL, | |||
location varchar(25) check (location in ('north', 'south', 'west', 'east', 'northeast', 'southeast', 'southwest', 'northwest')), | |||
install_date date | |||
); | |||
``` | |||
Insert the data into the preferred table: | |||
``` | |||
INSERT INTO playground (type, color, location, install_date) VALUES ('slide', 'blue', 'south', '2017-04-28'); | |||
INSERT INTO playground (type, color, location, install_date) VALUES ('swing', 'yellow', 'northwest', '2018-08-16'); | |||
``` | |||
View the added data: | |||
``` | |||
mysql> SELECT * FROM playground; | |||
+----------+-------+--------+-----------+--------------+ | |||
| equip_id | type | color | location | install_date | | |||
+----------+-------+--------+-----------+--------------+ | |||
| 1 | slide | blue | south | 2017-04-28 | | |||
| 2 | swing | yellow | northwest | 2018-08-16 | | |||
+----------+-------+--------+-----------+--------------+ | |||
2 rows in set (0.00 sec) | |||
mysql> exit | |||
``` | |||
Versie van 11 jan 2023 18:42
```bash
- cd /var/www/html/
- curl -LO https://files.phpmyadmin.net/phpMyAdmin/5.2.0/phpMyAdmin-5.2.0-all-languages.tar.gz
- tar xf phpMyAdmin-5.2.0-all-languages.tar.gz
- ln -s phpMyAdmin-5.2.0-all-languages phpMyAdmin
- vi /etc/httpd/conf.d/phpMyAdmin.conf
======================================
Alias /phpMyAdmin /var/www/html/phpMyAdmin <IfModule mod_rewrite.c> RewriteEngine On RewriteCond %{HTTPS} off RewriteRule ^(.*)$ https://%{HTTP_HOST}%{REQUEST_URI} [L,R=301] </IfModule>
<Directory "/var/www/html/phpMyAdmin"> AllowOverride AuthConfig FileInfo Indexes Limit Options=Indexes,IncludesNOEXEC,MultiViews,SymLinksIfOwnerMatch,FollowSymLinks,None Options -ExecCGI -Includes +IncludesNOEXEC Require all granted
- Require all denied
- Require ip 10.0.36.0/24
<FilesMatch "\.(inc|php)$"> <If "-f %{REQUEST_FILENAME}"> AddHandler "proxy:unix:/var/opt/remi/php81/run/php-fpm/www.sock|fcgi://localhost" .inc .php </If> </FilesMatch> </Directory>
======================================
```
Om gebruik te maken van phpMyAdmin moet je wel een database hebben.
Om deze te installeren doe je het volgende:
``` sudo dnf install mariadb-server mariadb ```
Dependency Tree:
``` Transaction Summary
====================================================================
Install 13 Packages
Total download size: 18 M Installed size: 107 M Is this ok [y/N]: y ```
Once installed, start and enable MariaDB the service:
``` sudo systemctl enable --now mariadb ```
Verify if the service is running:
``` $ systemctl status mariadb ● mariadb.service - MariaDB 10.5 database server
    Loaded: loaded (/usr/lib/systemd/system/mariadb.service; enabled; vendor preset: disabled)
    Active: active (running) since Sat 2022-07-23 10:05:47 CEST; 2s ago
      Docs: man:mariadbd(8)
            https://mariadb.com/kb/en/library/systemd/
   Process: 18153 ExecStartPre=/usr/libexec/mariadb-check-socket (code=exited, status=0/SUCCESS)
   Process: 18175 ExecStartPre=/usr/libexec/mariadb-prepare-db-dir mariadb.service (code=exited, status=0/SUCCESS)
   Process: 20589 ExecStartPost=/usr/libexec/mariadb-check-upgrade (code=exited, status=0/SUCCESS)
  Main PID: 20448 (mariadbd)
    Status: "Taking your SQL requests now..."
     Tasks: 12 (limit: 23441)
    Memory: 78.5M
       CPU: 268ms
    CGroup: /system.slice/mariadb.service
            └─20448 /usr/libexec/mariadbd --basedir=/usr
```
- #2. Using MariaDB on Rocky Linux 9|AlmaLinux 9
Once installed MariaDB/MySQL databases can be used. First, secure the installation by setting a password for the root user.
```bash sudo mysql_secure_installation ```
Proceed as shown: On MariaDB:
``` NOTE: RUNNING ALL PARTS OF THIS SCRIPT IS RECOMMENDED FOR ALL MariaDB
SERVERS IN PRODUCTION USE! PLEASE READ EACH STEP CAREFULLY!
In order to log into MariaDB to secure it, we'll need the current password for the root user. If you've just installed MariaDB, and haven't set the root password yet, you should just press enter here.
Enter current password for root (enter for none): Press_Enter OK, successfully used password, moving on...
Setting the root password or using the unix_socket ensures that nobody can log into the MariaDB root user without the proper authorisation.
You already have your root account protected, so you can safely answer 'n'.
Switch to unix_socket authentication [Y/n] y
You already have your root account protected, so you can safely answer 'n'.
Change the root password? [Y/n] y New password: Re-enter new password: Password updated successfully! ..... Remove anonymous users? [Y/n] y .... Disallow root login remotely? [Y/n] y ... Remove test database and access to it? [Y/n] y .... Reload privilege tables now? [Y/n] y All done! If you've completed all of the above steps, your MariaDB installation should now be secure.
Thanks for using MariaDB! ```
Now login using the created root password:
``` $ mysql -u root -p Enter password: Welcome to the MySQL monitor. Commands end with ; or \g. Your MySQL connection id is 10 Server version: 8.0.28 Source distribution
Copyright (c) 2000, 2022, Oracle and/or its affiliates.
Oracle is a registered trademark of Oracle Corporation and/or its affiliates. Other names may be trademarks of their respective owners.
Type 'help;' or '\h' for help. Type '\c' to clear the current input statement.
mysql> ```
``` mysql> SELECT VERSION(); ```
Sample Output:

- Create a User and Database:
To create a user and database in MariaDB/MySQL, use the commands below replacing where required:
``` CREATE DATABASE sampledb; CREATE USER 'test_user'@'%' IDENTIFIED BY 'Passw0rd'; GRANT ALL ON sampledb.* TO 'test_user'@'%' WITH GRANT OPTION; FLUSH PRIVILEGES; ```
After this, you will have a database named **sampledb** and a user **test_user** who can be accessed remotely created as swell.
Check the available databases:
``` mysql> SHOW databases; +--------------------+ | Database | +--------------------+ | information_schema | | mysql | | performance_schema | | sampledb | | sys | +--------------------+ 5 rows in set (0.00 sec)
mysql> ```
View users:
``` mysql> SELECT User, Host FROM mysql.user; +------------------+-----------+ | User | Host | +------------------+-----------+ | test_user | % | | mysql.infoschema | localhost | | mysql.session | localhost | | mysql.sys | localhost | | root | localhost | +------------------+-----------+ 5 rows in set (0.00 sec)
mysql> ```
To delete a user, use the command with the below syntax:
``` DROP USER 'username'@'host'; ```
- Create Tables
We can then create and insert data into a table. For example in the created table above:
``` USE sampledb;
CREATE TABLE playground (
   equip_id serial PRIMARY KEY,
   type varchar (50) NOT NULL,
   color varchar (25) NOT NULL,
   location varchar(25) check (location in ('north', 'south', 'west', 'east', 'northeast', 'southeast', 'southwest', 'northwest')),
   install_date date
); ```
Insert the data into the preferred table:
``` INSERT INTO playground (type, color, location, install_date) VALUES ('slide', 'blue', 'south', '2017-04-28'); INSERT INTO playground (type, color, location, install_date) VALUES ('swing', 'yellow', 'northwest', '2018-08-16'); ```
View the added data:
``` mysql> SELECT * FROM playground; +----------+-------+--------+-----------+--------------+ | equip_id | type | color | location | install_date | +----------+-------+--------+-----------+--------------+ | 1 | slide | blue | south | 2017-04-28 | | 2 | swing | yellow | northwest | 2018-08-16 | +----------+-------+--------+-----------+--------------+ 2 rows in set (0.00 sec)
mysql> exit ```